
Create your own chat bot
With AIR, AS3 and PHP
Hi there. I hope you are well.
In this new tutorial, we will see how to create a chatterbot (like Siri, Google Assistant, Alexa and Cortona) mobile application compatible with Android and iOS.
This application will be coded with AS3 and compiled using Adobe AIR. The remote program (Program-O in this example) will be installed on your own web server.
If you want to see what can be achieved by programs, you can take a look on your favorite search engine for something like “AIML program” or “nlp machine learning”.
We will use Starling/Feathers as frameworks, and ezSTT/ezSpeech as ANEs to handle natural speaking functions.
So… It will work same on Android, iOS by the holy power of AIR, AS3 and ProgramO.
Introduction
Natural speaking concepts are interresting only if the machine can answer something cool when we speak to it. This one can be followed by an action (but this will be the subject of another post).
In fact, what we gonna build today is a modest Siri (or Google Agent) like system.
We will talk to it. And, that’s the magic of programs, it will give answers.
Don’t put the blame on me if your bot don’t answer what you want it to. You’re the boss.
YOU ARE THE ONLY MASTER OF YOUR OWN “JARVIS”!!!
Before we start this first part, we need to download some tools (if you read this post, you use those tools).
Starling
Feathers
AIR SDK & Compiler
https://www.adobe.com/devnet/air/air-sdk-download.html
Starling / Feathers SDK and AIR SDK & Compiler All In One
To simplify this part, you can download Feathers SDK Manager.
https://feathersui.com/sdk/download/
Spinner (from Marpies)
– I really love your work, it saves me lot of working days –
https://github.com/marpies/material-design-spinner
Program-O
https://program-o.com/v2/download
ezSTT
https://fabricemontfort.com/product/ezstt-ane-air-native-extension/
ezSpeech
https://fabricemontfort.com/product/ezspeech-ane-air-native-extension/
Everything is on your computer ? Ok! It seems that you are now ready to start to build your bot.
The link to the entire source code and a video demo are available at the end of this post.
Installing Program-O
The “intelligence” of this system is not designed by me. I’ll only show you a small part of what can be achieved with a conversationnal agent. Maybe this code base will be useful for your future projects.
AS3 and AIR are not required to achieve this, this can be ported to every language that can touch Speech APIs.
Let’s start with this little exercise…
First, uncompress the Program-O archive to your computer.
Open you favorite FTP Client.
Upload the content of Program-O archive to your web server in “program-o” folder. If you want to choose a different name, YOU can, and please: “remember this one ’til the end”).
Create a new database on your server (this may be irrelevant if you want to use the same database for all your online projects – I personnaly prefer to have a private database for each project – maybe something like I love to put every idea in its private box… Yeah I’m a nerd).

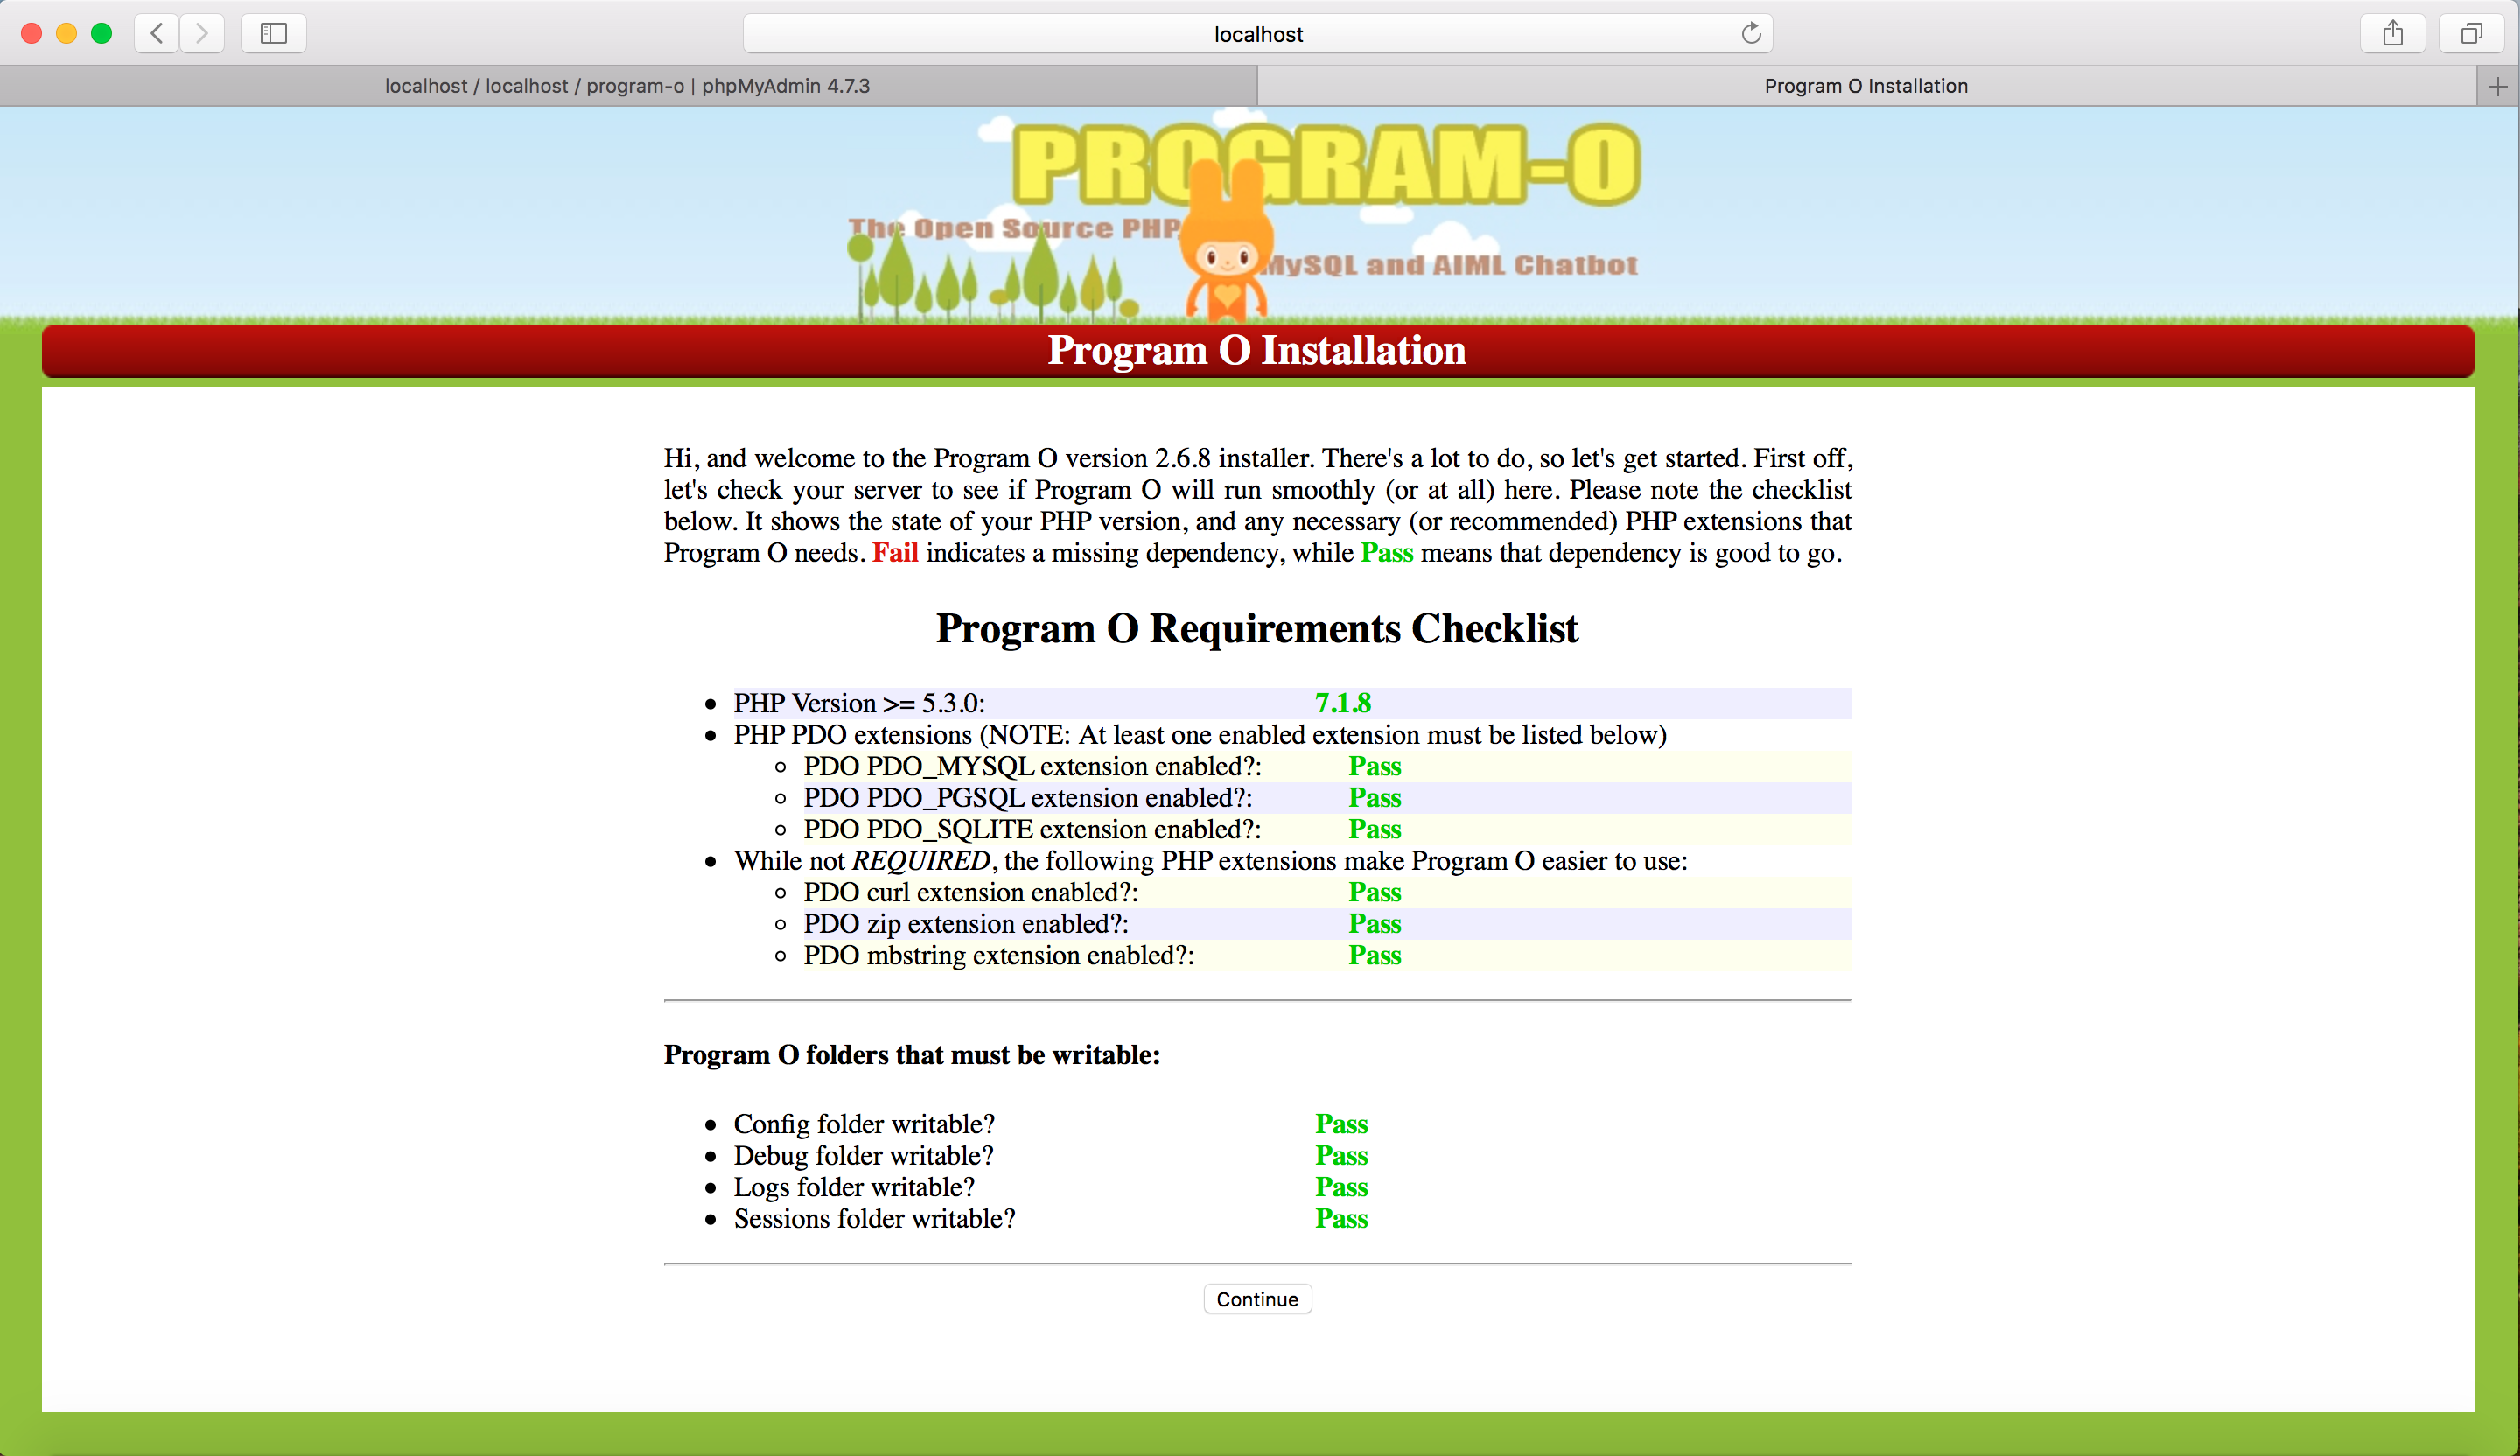
Open your favorite browser and point to Program-O install folder:
https://your_webserver/program-o/install/ (for me it was https://localhost/program-o/install/).
Check (twice) that everything is OK and click “continue”.
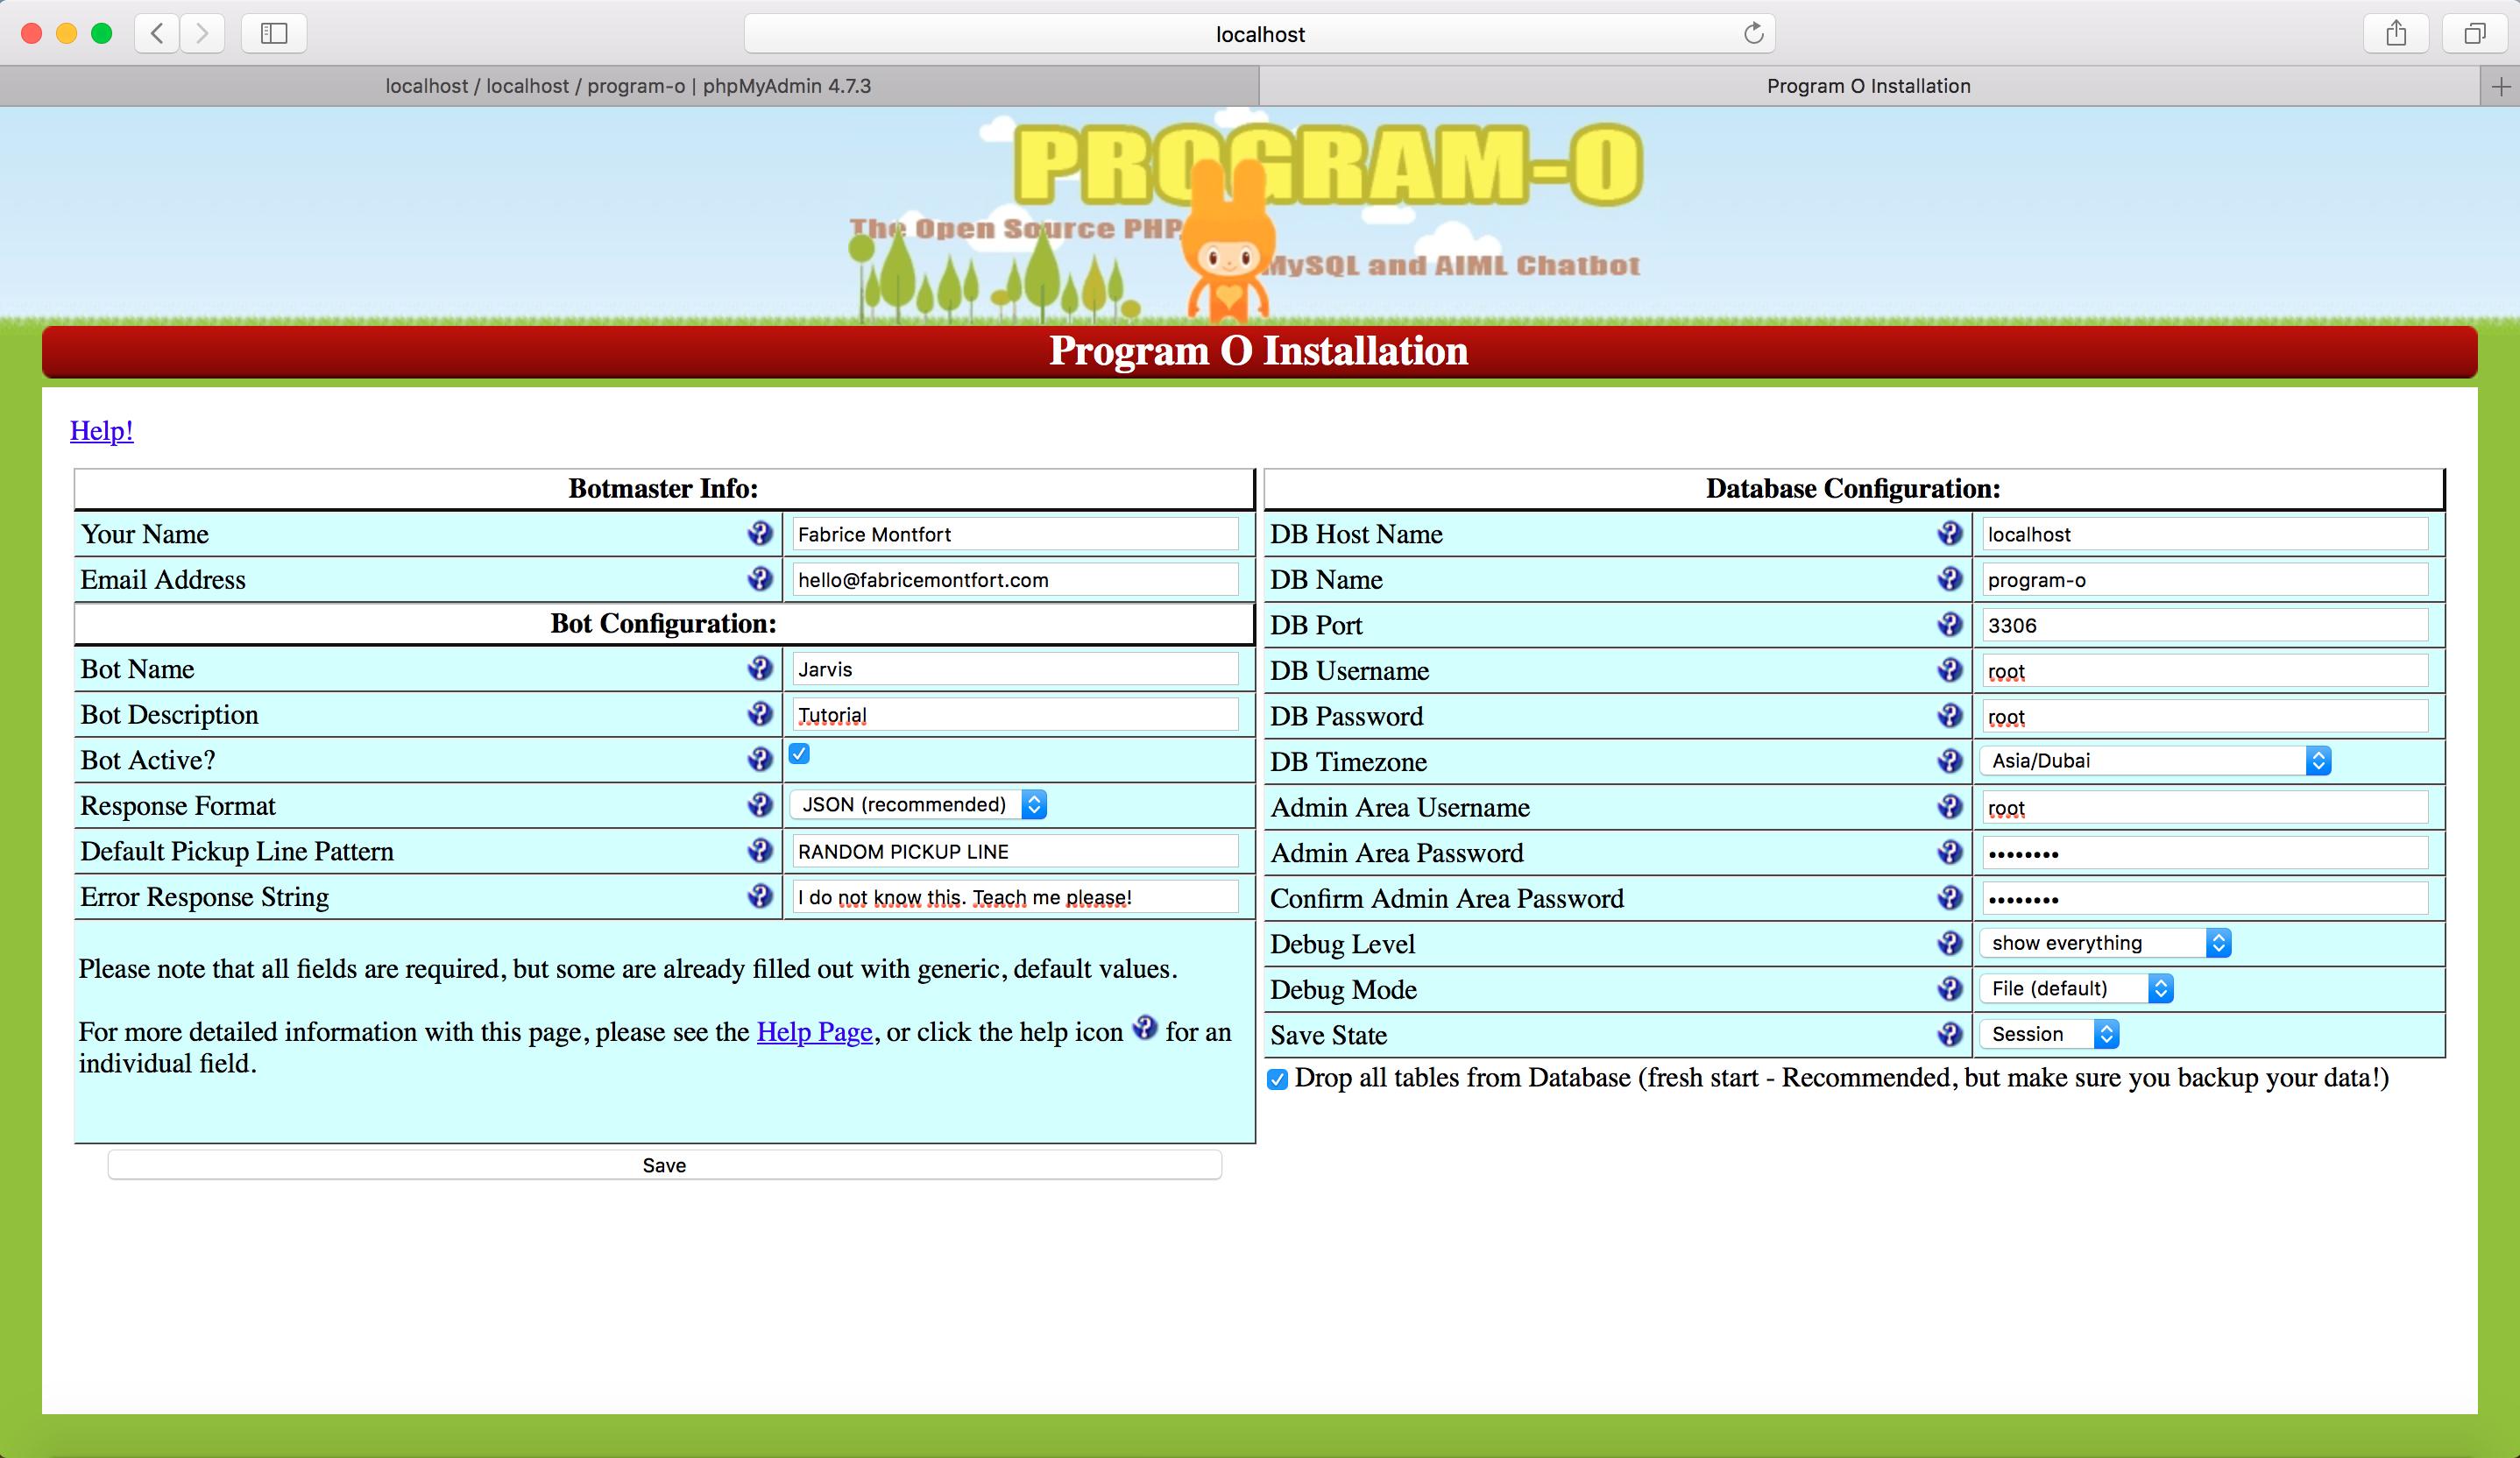
On the next screen you’ll have to enter some informations. Your name, email address, the name of your bot, response format (I use JSON for this tutorial, but you can use HTML or XML for your own use), and most important: MySQL settings and debug informations.
One time again, check twice your informations to make Program-O working properly. Then, click “save”.
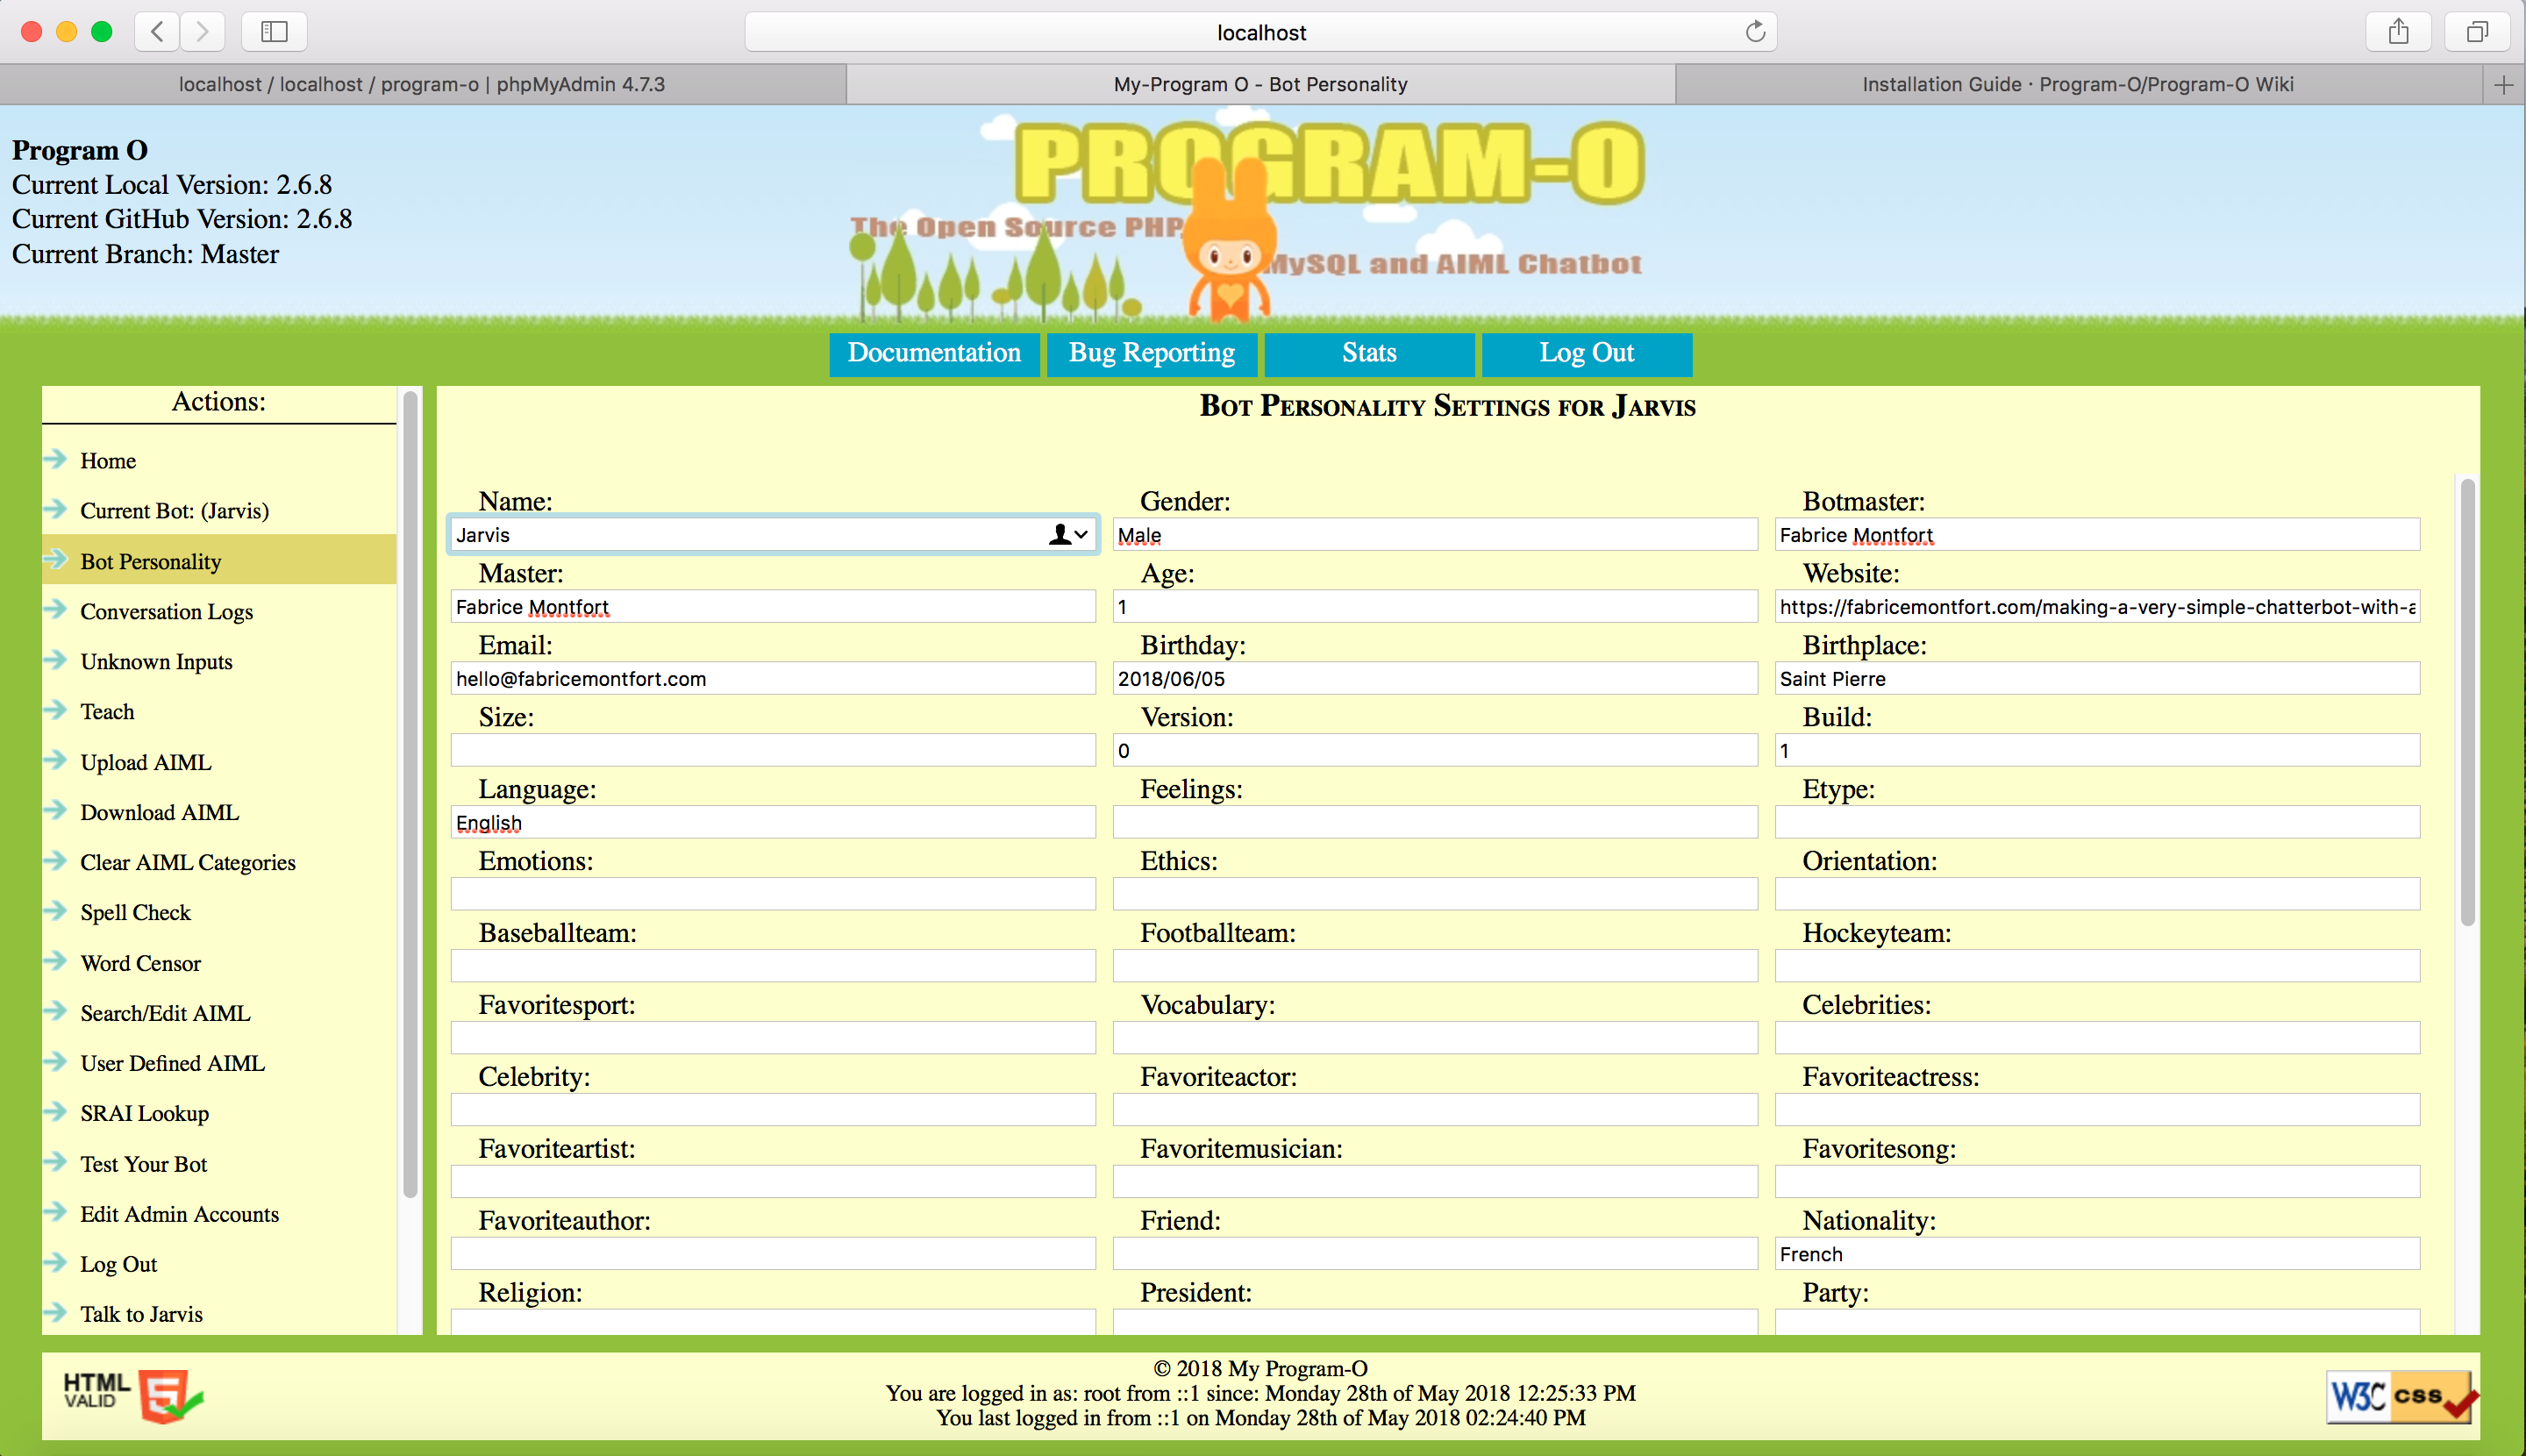
Log into the Admin page of Program-O with your credentials. And go to “Bot Personnality”, then fill up the blank fields with your own bot informations. After you add your bot infos in the fields, click on “Add bot infos”.
Test your bot
Inside your Program-O Admin page, go to “Test your bot” and start with a simple “Hi”. If everything is OK, it should answer with “I do not know this. Teach me please!”.
If you get some error on this, please check again the previous steps. If you get some weird error, Program-O team is reactive and will help you to get it working. AND it’s an open source language, you can fork and contribute.
Go to https://github.com/Program-O/Program-O/issues or https://program-o.com/v2/contact
If you get no error, you are now ready to teach some basics to your bot.
Add simple interactions to your bot
For this tutorial, we only add 2 files. The first one (greetings.aiml) lists the ways a user can say “hello”. The second one (username.aiml) will handle the ways a user can talk about is name with the bot.
In both files, we have an enumeration of possible user inputs and the logic (srai) to compose an answer.
For a complete list of tags of AIML markup language, you can take a look at this cool site (and explore further):
https://www.tutorialspoint.com/aiml/aiml_basic_tags.htm
Let’s go!
greetings.aiml
This file is a very simple list of patterns which calls the same srai template.
|
1 2 3 4 5 6 7 8 9 10 11 12 13 14 15 16 17 18 19 20 21 22 23 24 25 26 27 28 29 30 31 32 33 34 35 36 37 38 39 40 41 42 43 44 45 |
<?xml version="1.0" encoding="UTF-8"?> <aiml version="2.0"> <category> <pattern>HI</pattern> <template><srai>HELLO</srai></template> </category> <category> <pattern>HELLO</pattern> <template><srai>HELLO</srai></template> </category> <category> <pattern>HOWDY</pattern> <template><srai>HELLO</srai></template> </category> <category> <pattern>WELCOME</pattern> <template><srai>HELLO</srai></template> </category> <category> <pattern>GREETING</pattern> <template><srai>HELLO</srai></template> </category> <category> <pattern>HEY</pattern> <template><srai>HELLO</srai></template> </category> <category> <pattern>YO</pattern> <template><srai>HELLO</srai></template> </category> <category> <pattern>HELLO</pattern> <template> <random> <li>HI</li> <li>HELLO</li> <li>HOWDY</li> <li>WELCOME</li> <li>GREETING</li> <li>HEY</li> <li>YO</li> </random> </template> </category> </aiml> |
username.aiml
This file is a little experiment to handle multiple ways to store and retrieve the username. It can be modified to fit your needs or, ever better, upgraded to be more efficient.
|
1 2 3 4 5 6 7 8 9 10 11 12 13 14 15 16 17 18 19 20 21 22 23 24 25 26 27 28 29 30 31 32 33 34 35 36 37 38 39 40 41 42 43 44 45 46 47 48 49 50 51 52 53 54 55 56 57 58 59 60 61 62 63 64 65 66 67 68 69 70 71 72 |
<?xml version="1.0" encoding="UTF-8"?> <aiml version="2.0"> <category> <pattern>MY NAME IS *</pattern> <template> <think> <set name="username"><star/></set> </think> <srai>SET USERNAME</srai> </template> </category> <category> <pattern>I AM *</pattern> <template> <think> <set name="username"><star/></set> </think> <srai>SET USERNAME</srai> </template> </category> <category> <pattern>I'M *</pattern> <template> <think> <set name="username"><star/></set> </think> <srai>SET USERNAME</srai> </template> </category> <category> <pattern>WHO AM I</pattern> <template><srai>GET USERNAME</srai></template> </category> <category> <pattern>* WHO AM I</pattern> <template><srai>GET USERNAME</srai></template> </category> <category> <pattern>WHO AM I *</pattern> <template><srai>GET USERNAME</srai></template> </category> <category> <pattern>* WHO AM I *</pattern> <template><srai>GET USERNAME</srai></template> </category> <category> <pattern>* MY NAME</pattern> <template><srai>GET USERNAME</srai></template> </category> <category> <pattern>SET USERNAME</pattern> <template> <random> <li>I'LL REMEMBER YOUR NAME <get name="username"/></li> <li>OK <get name="username"/></li> <li>HI <get name="username"/>. NICE TO MEET YOU</li> <li><get name="username"/> IS A NICE NAME</li> </random> </template> </category> <category> <pattern>GET USERNAME</pattern> <template> <random> <li>YOUR NAME IS <get name="username"/></li> <li>YOU TOLD ME THAT YOUR NAME IS <get name="username"/></li> <li>HEY <get name="username"/>. ARE YOU KIDDING?</li> <li>I REMEMBER YOUR NAME IS <get name="username"/></li> </random> </template> </category> </aiml> |
If you want to re-invent ALICE, you can get an english version here (that’s a base):
https://github.com/fastcoding/aiml-en-us-foundation-alice.v1-6
There’s tons of bot personnalities and complete sets of AIML files on the web (in number of langs), you can search, download and install these files freely in most case.
From here, you can play with your bot on a few words. Let’s see how to “really” talk with it using natural language.
Creating the interface on mobile
I use OSX as an OS and IDEA IntelliJ as a IDE. Please feel free to adapt this to your own environnement.
Create a new project. It’s a Flash/AIR Project (oops… Animate… oops… AS3… rhhhhh…. I’m so sad to cannot name it… like Voldemort…)…
Adobe… If you don’t know what to do with AIR, let’s talk… I know my fellows want to use it on PS3/4, XBox and Wii… We have a Mustang GT and we only drive on country roads.
For this tutorial I use Starling/Feathers MXML. First cause I like this kind of cool abstract. And, finally, cause I love this kind of cool abstract. Here’s the very simple interface. A single screen with two images, three labels and a touch event. To speak, touch the screen of your mobile device, the bot will answer.
For basic explainations, see the comments.
|
1 2 3 4 5 6 7 8 9 10 11 12 13 14 15 16 17 18 19 20 21 22 23 24 25 26 27 28 29 30 31 32 33 34 35 36 37 38 39 40 41 42 43 44 45 46 47 48 49 50 51 52 53 54 55 56 57 58 59 60 61 62 63 64 65 66 67 68 69 70 71 72 73 74 75 76 77 78 79 80 81 82 83 84 85 86 87 88 89 90 91 92 93 94 95 96 97 98 99 100 101 102 103 104 105 106 107 108 109 110 111 112 113 114 115 116 117 118 119 120 121 122 123 124 125 126 127 128 129 130 131 132 133 134 135 136 137 138 139 140 141 142 143 144 145 146 147 148 149 150 151 152 153 154 155 156 157 158 159 160 161 162 163 164 165 166 167 168 169 170 171 172 173 174 175 176 177 178 179 180 181 182 183 184 185 186 187 188 189 190 191 192 193 194 195 196 197 198 199 200 201 202 203 204 205 206 207 208 209 210 211 212 213 214 215 216 217 218 219 220 221 222 223 224 225 226 227 228 229 230 231 232 233 234 235 236 237 238 239 240 241 242 243 244 245 246 247 248 249 250 251 252 253 254 255 256 257 258 259 260 261 262 263 264 265 266 267 268 269 270 271 272 273 274 275 276 277 278 279 280 281 282 283 284 285 286 287 288 289 290 291 292 293 294 295 296 297 298 299 300 301 302 |
<?xml version="1.0" encoding="utf-8"?> <f:Application xmlns:f="library://ns.feathersui.com/mxml" xmlns:fx="http://ns.adobe.com/mxml/2009" theme="feathers.themes.MetalWorksMobileTheme"> <!-- GLOBAL LAYOUT FOR THE APPLICATION --> <f:layout> <f:AnchorLayout/> </f:layout> <!-- THIS IMAGE SHOW A BUNNY FOR THE BOT --> <f:ImageLoader source="/assets/images/bunny.png"> <f:layoutData> <f:AnchorLayoutData top="10" horizontalCenter="0"/> </f:layoutData> </f:ImageLoader> <!-- THIS LABEL WILL BE USED TO SHOW BOT ANSWERS --> <f:Label id="botLabel" styleName="{Label.ALTERNATE_STYLE_NAME_HEADING}" wordWrap="true"> <f:layoutData> <f:AnchorLayoutData horizontalCenter="0" top="90"/> </f:layoutData> </f:Label> <!-- THIS IMAGE SHOW A BUNNY FOR THE BOT --> <f:ImageLoader source="/assets/images/me.png"> <f:layoutData> <f:AnchorLayoutData bottom="10" horizontalCenter="0"/> </f:layoutData> </f:ImageLoader> <!-- THIS LABEL WILL BE USED TO SHOW USER VOICE INPUTS --> <f:Label id="userLabel" styleName="{Label.ALTERNATE_STYLE_NAME_HEADING}" wordWrap="true"> <f:layoutData> <f:AnchorLayoutData horizontalCenter="0" bottom="90"/> </f:layoutData> </f:Label> <!-- THIS LABEL WILL BE USED TO SHOW USER INSTRUCTIONS --> <f:Label id="instructionsLabel" text="TOUCH THE SCREEN TO TALK WITH THE BOT" styleName="{Label.ALTERNATE_STYLE_NAME_DETAIL}" wordWrap="true"> <f:layoutData> <f:AnchorLayoutData horizontalCenter="0" verticalCenter="0"/> </f:layoutData> </f:Label> <!-- THIS LAYOUTGROUP IS USED TO HANDLE TOUCH --> <f:LayoutGroup id="touchLayoutGroup" backgroundSkin="{new Quad(1,1,0x000000)}" alpha="0.01" touchable="true"> <f:layoutData> <f:AnchorLayoutData percentWidth="100" percentHeight="100"/> </f:layoutData> </f:LayoutGroup> <fx:Script> <![CDATA[ /** * EZSTT IMPORTS */ import com.fabricemontfort.air.ezSTT; import com.fabricemontfort.air.ezSpeech; import com.fabricemontfort.air.ezspeech.languages; import com.fabricemontfort.air.ezstt.STTEvent; import com.fabricemontfort.air.ezstt.languages; /** * FEATHERS / STARLING IMPORTS */ import starling.display.Quad; import starling.events.Touch; import starling.events.TouchEvent; import starling.events.TouchPhase; import feathers.controls.Alert; import feathers.data.ListCollection; import feathers.core.PopUpManager; import feathers.extensions.MaterialDesignSpinner; import starling.animation.Juggler; /** * FLASH IMPORTS */ import flash.events.Event; import flash.events.HTTPStatusEvent; import flash.events.SecurityErrorEvent; import flash.events.IOErrorEvent; /** * IS EVERYTHING OK FOR THE DEMO ? */ private var readyToDemonstrate:Boolean = false; /** * EZSTT & EZSPEECH LIBS AND CONSTANTS */ private var stt:ezSTT; private var tts:ezSpeech; private const SPEED:Number = 0.51; private const PITCH:Number = 0.65; /** * PROGRAM-O SERVER */ private const DOMAIN:String = "192.168.1.6"; private const DIRECTORY:String = "program-o"; /** * SPINNER */ private var spinner:MaterialDesignSpinner; /** * OVERRIDE THE PROTECTED FUNCTION INITIALIZE * WE INSTANCIATE ALL WE NEED HERE */ override protected function initialize():void { super.initialize(); spinner = new MaterialDesignSpinner(); spinner.color = 0xffffff; // Check is ezSTT is supported on the mobile device if (ezSTT.instance.isSupported()) { // Initialize Speech To Text stt = ezSTT.instance; stt.debug = true; stt.setLanguage(com.fabricemontfort.air.ezstt.languages.EN); if (stt.isAuthorized()) { // Add STT listeners for final result, partial result, volume, end of speech stt.addEventListener(STTEvent.PARTIAL, onSTTResult); stt.addEventListener(STTEvent.FINAL, onSTTResult); stt.addEventListener(STTEvent.STOP, onSTTStop); // Everything is fine, lets start readyToDemonstrate = true; // STT is not autorized } else { // Initialize STT listener for permissions stt.addEventListener(STTEvent.AUTH, onAuth); // Ask for permissions stt.askUserAuthorization(); } } if (ezSpeech.instance.isSupported()) { // Initialize Text To Speech tts = ezSpeech.instance; tts.debug = true; tts.setPitch(PITCH); tts.setSpeed(SPEED); tts.setLanguage(com.fabricemontfort.air.ezspeech.languages.US); } touchLayoutGroup.addEventListener(starling.events.TouchEvent.TOUCH, touchHandler); } /** * TOUCH EVENT HANDLER */ private function touchHandler(event:TouchEvent):void { var touch:Touch = event.getTouch(touchLayoutGroup); // User release the touch if(touch.phase == TouchPhase.ENDED) { if (readyToDemonstrate) { // We are ready to play with STT // Show a spinner to prevent double touch PopUpManager.addPopUp(spinner, true, true); stt.start(); } } } private function onAuth(event:STTEvent):void { // Check if STT is authorized if (stt.isAuthorized()) { // Remove this listener stt.removeEventListener(STTEvent.AUTH, onAuth); // Add STT listeners for final result, partial result, volume, end of speech stt.addEventListener(STTEvent.PARTIAL, onSTTResult); stt.addEventListener(STTEvent.FINAL, onSTTResult); stt.addEventListener(STTEvent.STOP, onSTTStop); // Everything is fine, lets start readyToDemonstrate = true; // STT is not autorized } else { // Show an error message trace ("STT is not authorized. Check security on your phone settings"); } } /** * STT engine recognized words */ private function onSTTResult(event:STTEvent):void { // Set utterance with partial and final result userLabel.text = String(event.message).toUpperCase(); } /** * User stopped speaking */ private function onSTTStop(event:STTEvent):void { sendtobot(userLabel.text.toUpperCase()); } /** * Prepare an http query and send it to the server */ private function sendtobot(utterance:String):void { // See DOMAIN and DIRECTORY constants to handle your configuration var url:String = "http://" + DOMAIN + "/" + DIRECTORY + "/chatbot/conversation_start.php"; // Create a new URL Request var request:URLRequest = new URLRequest(url); // We have to send values to the bot to let it answer correctly var requestVars:URLVariables = new URLVariables(); requestVars.convo_id = "3c84c0ca7f9ae17842a370a3fbc90b63"; // YOU WILL HAVE TO CREATE AN UNIQUE ID FOR EACH USER requestVars.bot_id = 1; // CHECK YOUR BOT ID requestVars.format = "json"; requestVars.say = utterance; // Assign Variables and set method to URL Request request.data = requestVars; request.method = URLRequestMethod.POST; // Create an URL Loader var urlLoader:URLLoader = new URLLoader(); urlLoader.dataFormat = URLLoaderDataFormat.TEXT; // Set up listeners urlLoader.addEventListener(flash.events.Event.COMPLETE, loaderCompleteHandler, false, 0, true); urlLoader.addEventListener(HTTPStatusEvent.HTTP_STATUS, httpStatusHandler, false, 0, true); urlLoader.addEventListener(SecurityErrorEvent.SECURITY_ERROR, securityErrorHandler, false, 0, true); urlLoader.addEventListener(IOErrorEvent.IO_ERROR, ioErrorHandler, false, 0, true); try { // Send request to server urlLoader.load(request); } catch (e:Error) { // Or we trace the error trace(e); } } /** * Bot is answering */ private function loaderCompleteHandler(e:flash.events.Event):void { // Trace the answer trace("response: " + e.target.data); var obj:Object = JSON.parse(e.target.data); // Set the bot answer in the Label botLabel.text = String(obj.botsay).toUpperCase(); // If TTS is supported if (tts.isSupported()) { // Say the answer by voice tts.say(obj.botsay); } // Remove the spinner if (PopUpManager.isPopUp(spinner)) PopUpManager.removePopUp(spinner); } private function httpStatusHandler(e:HTTPStatusEvent):void { trace("httpStatusHandler:" + e); // Remove the spinner if (PopUpManager.isPopUp(spinner)) PopUpManager.removePopUp(spinner); } private function securityErrorHandler(e:SecurityErrorEvent):void { trace("securityErrorHandler:" + e); // Remove the spinner if (PopUpManager.isPopUp(spinner)) PopUpManager.removePopUp(spinner); } private function ioErrorHandler(e:IOErrorEvent):void { trace("IOError:" + e); // Remove the spinner if (PopUpManager.isPopUp(spinner)) PopUpManager.removePopUp(spinner); } ]]> </fx:Script> </f:Application> |
As always, you can download the full project with libs, assets, config files (for IDEA IntelliJ) on GitHub.
I think everything is online… It’s late for me…
https://github.com/Fabrice-Montfort/JARVIS-AS3-AIR-Voice-Interface-for-AIML-Bot-
I really hope this tutorial was useful for you and show you some new ways to do programs.
Feel free to send me a message, follow me on Twitter, Facebook or something else.
And as far that I know (and test it), it can be weird…
Do you want something even more cool ?
Stay tuned, I will publish in a few days (I promise) other tutorials to let you interact with virtual words (typically your game) or event better with the real world (IoT).
And don’t forget… AS3 and AIR rocks !!!!