Firebase and AS3
Episode 3 : Queries and map drawing
Hi there. I hope you are well.
In the previous episodes, we have learned how to:
Episode 1: create different services and applications on Firebase, Google and Facebook
Episode 2: login with OAuth 2.0, retrieve user profile, write data on Firebase
In this last episode, we will see how to do queries and drawing a map in a Starling / Feathers application.
Requierements
To make it working, we need a magic library: feathers-map.
Once again, I’ll do not tell you how to include a library into your project. This task is really easy.
The map screen
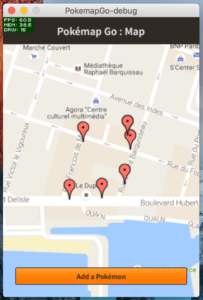
First we create a new screen for our application. And we put a map and a button on it.
|
1 2 3 4 5 6 7 8 9 10 11 12 13 14 15 16 17 18 19 20 21 22 23 24 25 26 27 28 29 30 31 32 33 34 35 36 37 38 39 40 41 42 43 44 45 46 47 48 49 50 51 52 53 54 55 56 57 58 59 60 61 62 63 64 65 66 67 68 69 70 71 72 73 74 75 76 77 78 79 80 81 82 83 84 85 86 87 88 89 90 91 92 93 94 95 96 97 98 99 100 101 102 103 104 105 106 107 108 109 110 111 112 113 114 115 116 117 118 119 120 121 122 123 124 125 126 127 128 129 130 131 132 133 134 135 136 137 138 139 140 141 142 143 144 145 146 147 148 149 150 151 152 153 154 155 156 157 158 159 160 161 162 163 164 165 166 167 168 169 170 171 172 173 174 175 176 177 178 179 180 181 182 183 184 185 186 |
package screens { import com.fabricemontfort.JWT; import flash.events.Event; import flash.events.GeolocationEvent; import flash.events.IOErrorEvent; import flash.events.SecurityErrorEvent; import flash.events.StatusEvent; import flash.geom.Point; import flash.net.URLLoader; import flash.net.URLRequest; import flash.net.URLRequestMethod; import flash.sensors.Geolocation; import cz.j4w.map.MapLayerOptions; import cz.j4w.map.MapOptions; import cz.j4w.map.geo.GeoMap; import cz.j4w.map.geo.Maps; import feathers.controls.Button; import feathers.controls.PanelScreen; import feathers.layout.AnchorLayout; import feathers.layout.AnchorLayoutData; import feathers.layout.HorizontalAlign; import feathers.layout.VerticalAlign; import models.pokemapGoUserData; import starling.display.Image; import starling.events.Event; import starling.textures.Texture; public class MapScreen extends PanelScreen { public static const GO_FORM:String = "goForm"; private var geo:Geolocation; private var user:pokemapGoUserData; private var mapOptions:MapOptions; private var geoMap:GeoMap; private var googleMaps:MapLayerOptions; [Embed(source = "/assets/marker.png")] private var MarkerClass:Class; public function MapScreen() { trace ("Map loaded"); user = pokemapGoUserData.instance(); super(); } override protected function initialize():void { trace ("Map initialize"); super.initialize(); this.title = "Pokémap Go : Map"; if (Geolocation.isSupported) { geo = new Geolocation(); geo.setRequestedUpdateInterval(1000); if (!geo.muted) { geo.addEventListener(GeolocationEvent.UPDATE, updateGeolocationHandler); } else { trace ("Geolocation feature is muted"); } geo.addEventListener(StatusEvent.STATUS, statusGeolocationHandler); } else { trace ("Geolocation feature not supported"); } var _layout:AnchorLayout = new AnchorLayout(); this.layout = _layout; mapOptions = new MapOptions(); mapOptions.initialCenter = new Point(55.47535833333333, -21.342465); mapOptions.initialScale = 1 / 32; mapOptions.disableRotation = true; geoMap = new GeoMap(mapOptions); geoMap.setSize(stage.stageWidth, stage.stageHeight); geoMap.layoutData = new AnchorLayoutData(0, 0, 0, 0); geoMap.x = geoMap.y = 0; addChild(geoMap); googleMaps = Maps.GOOGLE_MAPS; googleMaps.notUsedZoomThreshold = 1; geoMap.addLayer("googleMaps", googleMaps); var _formBtn:Button = new Button(); _formBtn.label = "Add a Pokémon"; _formBtn.width = stage.width - 40; var aLD:AnchorLayoutData = new AnchorLayoutData(); aLD.bottom = 20; aLD.right = 20; aLD.left = 20; _formBtn.layoutData = aLD; _formBtn.addEventListener(starling.events.Event.TRIGGERED, onFormBtnTriggered); this.addChild(_formBtn); getPokemonsOnMap(); } private function onFormBtnTriggered():void { trace ("Form Button Triggered"); this.dispatchEventWith(GO_FORM, false, null); } protected function statusGeolocationHandler(event:StatusEvent):void { if (geo.muted) { geo.removeEventListener(GeolocationEvent.UPDATE, updateGeolocationHandler); } else { geo.addEventListener(GeolocationEvent.UPDATE, updateGeolocationHandler); } } protected function updateGeolocationHandler(event:GeolocationEvent):void { user.lat = event.latitude; user.lng = event.longitude; geoMap.setCenterLongLat(user.lng, user.lat); geoMap.invalidate(); } private function getPokemonsOnMap():void { var payload:Object = new Object(); payload.token = user.token; payload.provider = user.provider; payload.iat = int(new Date().getTime() / 1000); payload.v = "0"; payload.d = []; user.auth = JWT.encode(payload, "YOUR_FIREBASE_PROJECT_SECRET"); var request:URLRequest = new URLRequest( "https://YOUR_FIREBASE_PROJECT_ID.firebaseio.com/markers.json?auth="+user.auth); request.method = URLRequestMethod.GET; var requestor:URLLoader = new URLLoader(); requestor.addEventListener( flash.events.Event.COMPLETE, pokemonAdded ); requestor.addEventListener( IOErrorEvent.IO_ERROR, httpRequestError ); requestor.addEventListener( SecurityErrorEvent.SECURITY_ERROR, httpRequestError ); requestor.load( request ); } protected function httpRequestError(event:IOErrorEvent):void { trace( "An error occured: " + event.text ); } protected function pokemonAdded(event:flash.events.Event):void { trace ("Pokemon Retrieved from Firebase Database"); trace( event.target.data ); var markers:Object = JSON.parse(event.target.data); var markerTexture:Texture = Texture.fromEmbeddedAsset(MarkerClass); for (var item:String in markers) { var image:Image = new Image(markerTexture); image.alignPivot(HorizontalAlign.CENTER, VerticalAlign.BOTTOM); trace (item); geoMap.addMarkerLongLat("marker" + markers[item].uuid, markers[item].lng, markers[item].lat, image); } } } } |
Let me explain what we are doing.
On this new screen, we override the initialize method to put a title, draw a map and a button that call the next view.
We starts geolocation system on the phone with AIR runtime, and then adjust a few parameters.
Next, we make a Firebase Database REST API call to get all the markers that users sent. And finally, we draw them on the map.

The form screen
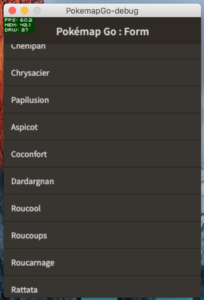
To enter data in our database, we need some kind of form. This one is the simplest I’ve found. Just a simple list which displays Pokémons names.
|
1 2 3 4 5 6 7 8 9 10 11 12 13 14 15 16 17 18 19 20 21 22 23 24 25 26 27 28 29 30 31 32 33 34 35 36 37 38 39 40 41 42 43 44 45 46 47 48 49 50 51 52 53 54 55 56 57 58 59 60 61 62 63 64 65 66 67 68 69 70 71 72 73 74 75 76 77 78 79 80 81 82 83 84 85 86 87 88 89 90 91 92 93 94 95 96 97 98 99 100 101 102 103 104 105 106 107 108 109 110 111 112 113 114 115 |
package screens { import com.fabricemontfort.GUID; import com.fabricemontfort.JWT; import flash.events.Event; import flash.events.IOErrorEvent; import flash.events.SecurityErrorEvent; import flash.net.URLLoader; import flash.net.URLRequest; import flash.net.URLRequestMethod; import feathers.controls.List; import feathers.controls.PanelScreen; import feathers.data.ListCollection; import feathers.layout.AnchorLayout; import feathers.layout.AnchorLayoutData; import models.pokemapGoUserData; import starling.events.Event; public class FormScreen extends PanelScreen { public static const GO_BACK:String = "goBack"; private var user:pokemapGoUserData; public function FormScreen() { trace ("Form loaded"); user = pokemapGoUserData.instance(); super(); } override protected function initialize():void { trace ("Form initialize"); super.initialize(); this.title = "Pokémap Go : Form"; var _layout:AnchorLayout = new AnchorLayout(); this.layout = _layout; var list:List = new List(); list.dataProvider = this.getPokemons(); list.layoutData = new AnchorLayoutData(0, 0, 0, 0); list.addEventListener( starling.events.Event.CHANGE, list_changeHandler ); this.addChild( list ); } private function list_changeHandler(event: starling.events.Event):void { var list:List = List( event.currentTarget ); trace( "Pokémons list selected item:", String(list.selectedItem) ); this.addPokemonToMap(String(list.selectedItem)); } private function getPokemons():ListCollection { if (user.pokemons != null) { return user.pokemons; } return null; } private function addPokemonToMap(pokemonName:String):void { var obj:Object = new Object(); obj.userId = user.profile.uid; obj.lat = user.lat; obj.lng = user.lng; obj.timestamp = int(new Date().getTime() / 1000); obj.uuid = GUID.create(); obj.pokemonName = pokemonName; var payload:Object = new Object(); payload.token = user.token; payload.provider = user.provider; payload.iat = int(new Date().getTime() / 1000); payload.v = "0"; payload.d = user.profile; user.auth = JWT.encode(payload, "YOUR_FIREBASE_PROJECT_SECRET"); var request:URLRequest = new URLRequest( "https://YOUR_FIREBASE_PROJECT_ID.firebaseio.com/markers.json?auth="+user.auth); request.method = URLRequestMethod.POST; request.data = JSON.stringify(obj); var requestor:URLLoader = new URLLoader(); requestor.addEventListener( flash.events.Event.COMPLETE, pokemonAdded ); requestor.addEventListener( IOErrorEvent.IO_ERROR, httpRequestError ); requestor.addEventListener( SecurityErrorEvent.SECURITY_ERROR, httpRequestError ); requestor.load( request ); } protected function httpRequestError(event:IOErrorEvent):void { trace( "An error occured: " + event.text ); } protected function pokemonAdded(event:flash.events.Event):void { //trace( event.target.data ); trace ("Pokemon Added on Firebase Database"); this.dispatchEventWith(GO_BACK, false, null); } } } |
For the explanations, this is what we do:
First, we override initialize method to create a list and an event handler on item change.
Then, we create a query to write data into Firebase Database with REST API.
When data is on the server, then we go back to map screen.

Have fun
You can use everything in this tutorial. The code, the idea… Just have fun with it.
If you publish an application based on this few lines of code, do not hesitate to send me a message. I will be very happy to share it with my friends (who play Pokémon Go to). 😀
I encourage you to read again this part to be very fluent with Firebase Database REST API.
And… Rendez-vous in Episode 4 for a surprise.
PAY ATTENTION !! In fact, this is a very bad practice to incorporate your Firebase Secret Key in an application that can be easily decompiled (and SWF can be reversed). This exercise is just meant to show that use of the REST service firebase is possible from AS3. Acquire JWT from Firebase server (or your own server) remains the best option and can be easily achieved through a simple HTML page using the Web SDK Firebase and a WebView.
